Thursday, March 31, 2016

Finishes Number 18, 19, 20, and 21, and other stuff.

Number 18 received very simple clamshell quilting with cables in the border.
This quilt began as a quiltsbycheri blog SAL, but I fell behind. Then I discovered some orphan blocks the same size as the ones in this sampler and combined them with what I had made and called it done. It has been in the closet for some time.

Number 19 was made when Kindred Quilts blog hosted an every-other-month-"Simply Charming Book" little quilt SAL some time ago. I made six little quilts that year from Tara Lyn Darr's book.
 This is the only one I hadn't yet quilted. And now I have. : )


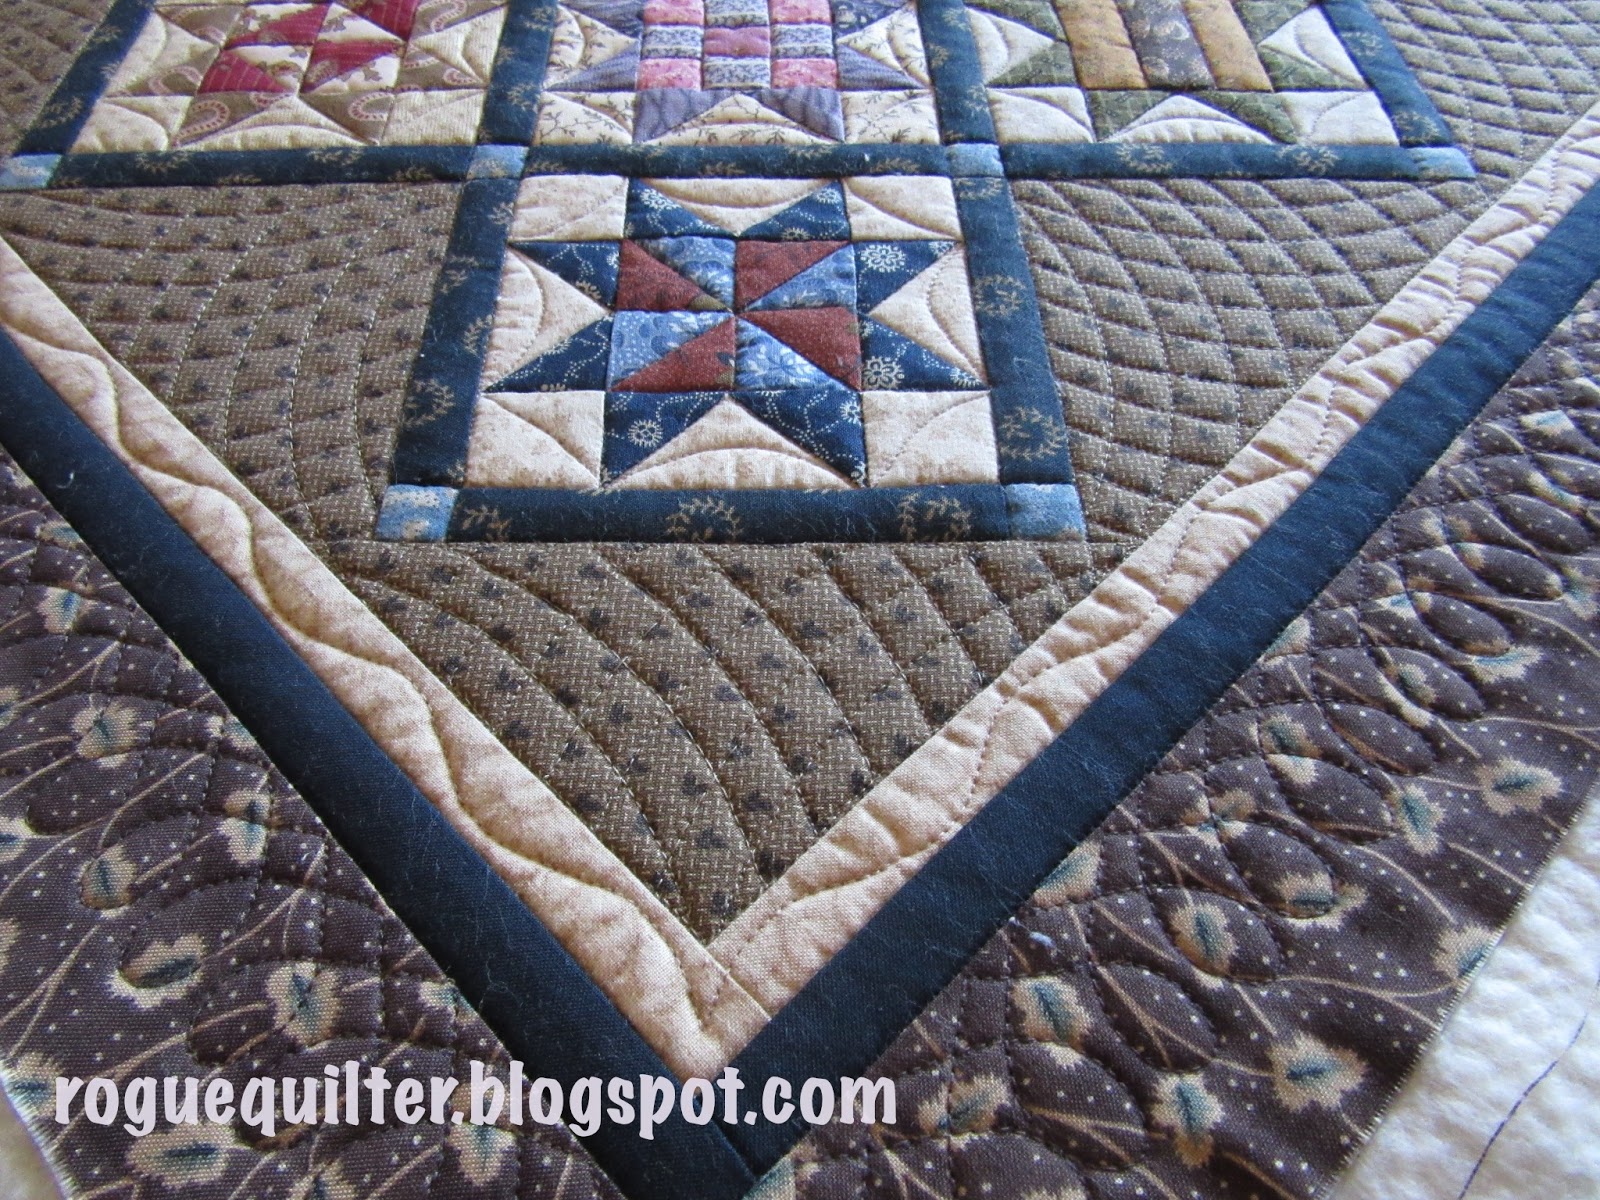
 You can click the photos if you want a closer view of the quilting designs.

These two (20 and 21) are not my usual style, I know, but I do love playing with batiks. The quilt on the right was another creation from the wealth of batik scraps I received in a swap years ago from Sandi (kwiltnkats blog). It was one of the first things I made from her scraps and is one of the last to get quilted.
I'm trying to think of a "K" name for this, in honor of Sandi, who names ALL of her many quilts (she is prolific and very talented) with names that start with "K".
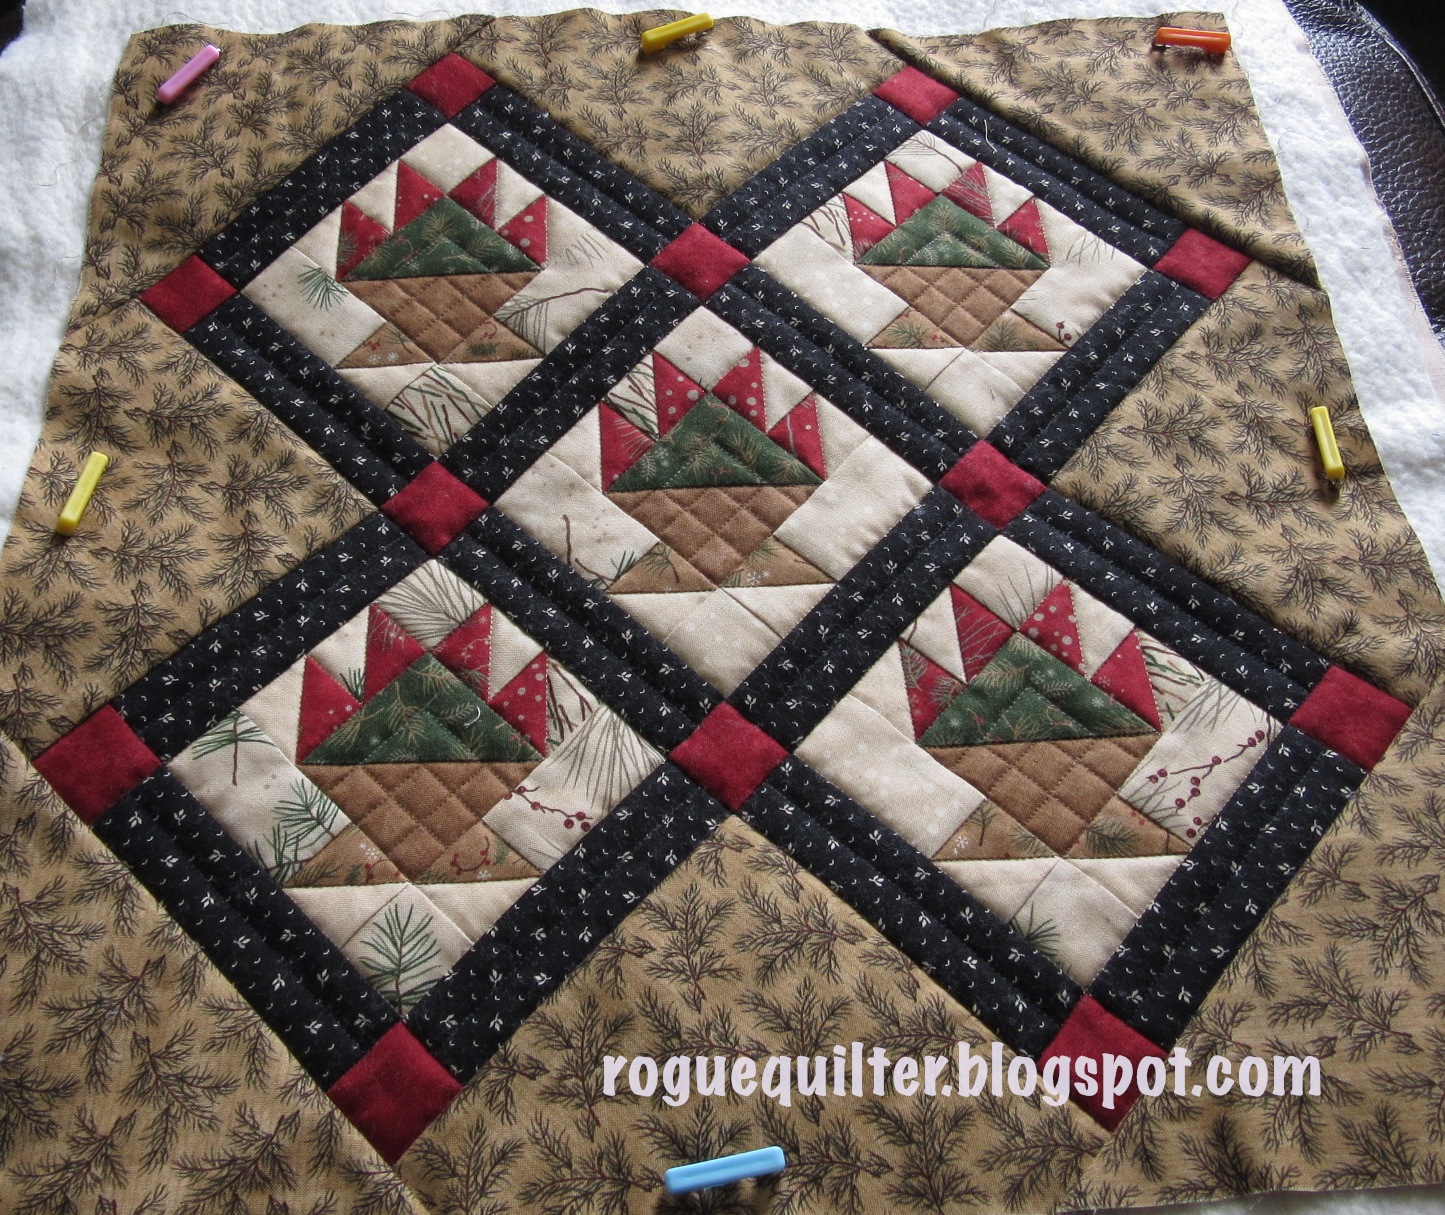
The basket quilt on the left was one of the four quilts I made when Temecula had their Blessing Baskets SAL. I call this one Mystic Baskets.  I did a different fill design around each basket.
There are pebbles, meander, paisley, hooked swirls, and feathers. The baskets finish at 4", so some of that fill work is pretty small.

I have decided to hand quilt this one, so it won't get finished quickly. This was a SAL by Lori (humblequilts blog) named Harmony.


Did you notice that four of the five quilts here were from SALs? Further proof that I have had no resistance in the past. I have been so proud of myself this year, I have made it 3 months without joining a SAL, and that has to be a record!


My ornaments were completed in time for Easter and will remain hanging through Spring. 


Made a little progress on one of my two little long term projects. This is Pinwheel Garden from Primitive Gatherings, as I have said before. The pattern calls for 12 of these blocks, so I am halfway there. But I can't decide if I want it square or rectangle. When I get 9 blocks finished I will decide if I am done.
There are two pieced borders, as well, and I have been cutting pieces for those as I go along. The pinwheels here finish at 1", and the blocks will finish at 4".

Have had the good fortune to receive zippered pouches from a couple of good friends in the blogging world. I love these, but have never ventured to make any myself because zippers are not my favorite thing to do. These bags are the handiwork of Teresa and Betty. Quality workmanship here on both bags. I love them! Thank you so much, ladies!

Until next time, 
Janet O.

Thursday, March 24, 2016

They just keep comin'!

Three more finishes! I can hardly believe it! (Yes, the sewing has been a bit frenetic around here lately.)
Summer Stars is bound, and I realized I had never shared a good photo of the log cabin mini when it was bound. (It had been in a group "finished" shot earlier, but it was pretty covered by other little quilts.) Plus, the 9-patch leader/ender demanded completion.
Finish #15:  I have wanted to have this one finished for a long time now, but had been at a loss as to how to quilt it. I think my best solution for situations like that is to start the ditch stitching and let the inspiration flow as I handle the quilt.


Finish #14: (I know, it is out of order) Love the little log cabins. This is now at home on the mini ladder in my living room.
Finish #16: This little 9-patch was made from the leftover logs, chopped into squares. The photo on the right gives you a size perspective.


Of the quilts in my recently basted batch, I have only ditch stitched this quilt and marked most of it for FMQing.
I didn't plan to get this bunch done as quickly as the previous ones--too much else going on. Besides, I'm getting tired of figuring out how to quilt everything. There is only one more I'm sure of, and then I may stall a while.

After all of this "dark & dirty" stuff, I had an urge to do something Spring-ish, so I grabbed a bag I keep stuffed with some of the more pastel repros, and I went to work with the scraps, making 2" baskets. This was the result.  Oh, I just realized that this makes Finish #17!! (I'm a little slow on the uptake.)
Didn't turn out quite how I had hoped--I think I should have used narrower sashing. This sashing finishes at 1/2" and the quilt is just over 8" square. That is too much sashing for such a small quilt. Those are pretty small feathers, too, but not the smallest I have ever stitched.

Love those grandkids!
But even if I am not enamored with it, I think it still looks sweet in its new home for Spring. I am calling it "Easter Baskets". Real original, huh? : )

And while the pastel scraps were handy, I made a few more ornaments to hang on my Shaker peg rack for the season. All of the pastel ones I have made before have been gifted away. These still need their stuffing and fluffing, but that won't take long.

With all of the finishes I've had this year I've been hanging little quilts in new places and tucking them in previously empty corners. Maybe one of these days I will do a post of where all of these quilts are ending up.
But first I need to convince my friend Gayle to share her little quilts and rugs all over her home--it is so much cooler than mine! (Are you getting the message, Gayle?)
And now I think it is time I woke up "the beast"! : )
Until next time,
Janet O.

P.S. Thanks, Mary, for this lovely batik that surprised me in the mail! One of these days you will learn to love batiks and you will be sorry you sent them to me. *LOL*


Saturday, March 19, 2016

Mission (almost) accomplished!

This will make fifteen little finishes just this year, once it is bound. That pile of little flimsies is getting tamed, slowly, but surely! This was Temecula's Summer Stars SAL, in a different setting than they used.
The number 15 doesn't include the wool mat and 2 pincushions I have squeezed in, too. Oh, it feels so good to see the pile of little flimsies down to almost nothing! (We won't talk about all of the bed-size ones hanging in the closet, okay?) Most of these were pieced between one and three years ago and have been languishing ever since!

This is only the second time I have tried curved cross-hatching on anything other than a practice sandwich. 
I love the look, but it is a bit fiddly to do.


You have to measure and mark the guidelines in each triangle.

Then you sew each individual arc going one direction, using a curved ruler as guide. Next you reverse and make the arcs coming from the other direction to create the cross-hatching.
All the while I have my straight edge ruler handy for all of the backtrack in the ditch you have to do when creating this design.

The curved rulers I use are from Jamie Wallen. He has videos on this same page that show how to do the curved cross-hatch in squares and triangles. Very helpful.

After finishing the cross-hatching, I couldn't find a design for the outer border that fit the dimensions and also matched the density on the cross-hatching.


I finally took a stencil, masked off one side of it, and tried staggering the pattern on a practice sandwich to see if it would fill in the way I hoped.
(I like to make my stencils work for me. I try to see them as more than just the obvious design.)

Then I marked the design in that overlapped way all around the quilt and stitched it in.
From this close-up you can also see that the sashing around the stars is a navy blue with a print in it. The outer dark border is solid navy. I ran out of the print and it was old enough I couldn't find more. I even had to piece it in a couple of places to sash the stars.


Now that same fabric has been reprinted as part of "Jo's Favorites", so I will be able to use it for the binding. The color is very true.
Here are the before and after shots of the latest batch, minus the batik mini. It is already gifted, but I have replaced it with the log cabin mini, which was a new start and finish this year.

The next batch of little quilts got basted Friday. Five of these are from past SALs (see why I am avoiding them?). I won't be getting these quilted as quickly--at least I don't think so.  I know how I will be quilting a couple of them. On the ones that currently elude me, I just start with the ditch stitching and hope that inspiration strikes before I finish that step.
I only have 6 more little flimsies left in the pile, and another 5 or 6 minis in the works. I want to do better in the future at not making as many starts until I catch up on more finishes. I know not everyone needs that, but when I have a mountain of unfinished business hanging over me it becomes oppressive to me. This doesn't mean I will not have UFOs anymore--not by a long shot!! But I don't like it when it gets too far out of hand!

Well, I have done it again--another lengthy post. My apologies. 
Until next time, when I hope I don't have so much to say!
Janet O.

Tuesday, March 15, 2016

A Quick Update

I know I don't usually post more than once a week, and it hasn't been a week since my last post, so I am getting ahead of myself. But I wanted to share the progress on the little flimsy pile.
A complete finish on this little quilt from Pam Buda's Orphans and Scraps SAL  back in 2013.

The quilting on these three is completed and the binding just needs to be stitched down by hand.


I did feather the basket quilt after all. Before I started the quilting I marked the outer boundary so the feathers didn't end up under the binding. Then I marked the curved spines for the feathers in the setting triangles. You can faintly see the white lines to the right.

I was pretty happy with the way the feathers turned out. I haven't stitched feathers for a while, so I was a bit hesitant to get started.
 For those who like to view things from the back, here is a view for you. : )

The log cabin quilt was fun, after I got the ditch stitching completed. I ditch stitched along every edge where the two contrasting color bands meet. Then I stitched a rope design in the light color and  a cable pattern in the dark colored logs.

Below is a view from the back.
I have seven more little quilts hanging in my sewing room, waiting next in line to be quilted.
That's all for now. Can you believe it? : )
Until next time, Janet O.

Friday, March 11, 2016

Down in the Ditch

I believe I have stated before that I take ditch stitching very seriously on my mini quilts. Well, that is what has pretty well consumed my sewing time since my last post. Here is the evidence.
Only just beginning the ditch stitching on the little log cabins. Then I have some cable designs I am thinking will go well down the furrows.

I was going to try to do this entire basket quilt with straight line quilting, but after doing all of the ditch stitching, and the basket weave and handles, I was sick of straight line quilting on this piece. I will set it aside for now.
The cross-hatching I had planned in the setting triangles may just be too much straight line for one little quilt. I may put feathers in them to juxtapose some curves onto all of the angles here.

This was a little Pam Buda SAL (Orphans and Scraps) a year or two ago. She made hers as a mini runner, but I wanted a little square. The blocks finish at 4". The 9-patch cornerstones are 1 1/2".
This was all ditch stitched, except the border. Often on minis I feel like too much fancy quilting can detract from the piecing, so I usually keep it pretty simple.

Here we have one of those Temecula SAL quilts that I tended to do in excess. I think I made three of these. The other two were gifted long ago and this one has yet to be finished. This SAL was called Summer Stars.  I wasn't enamored with the layout Temecula used, so I exchanged it for a layout they had used on similar sized blocks in another SAL called Blessing Baskets (I made 4 of that one).
Ditch stitching all finished here. This will probably get curved cross-hatching in the setting triangles, and I haven't decided yet on the outer border.

This is not a small quilt--it is a holiday table topper for the breakfast nook table. I pieced it from scraps I got in a scrap bin at a LQS years ago. I wanted to try a freehand holly design, and never could get up the courage. I finally went for it (after ditch stitching the borders).

This is the result. Better than I had hoped. As I stitched, I felt like the design was going down very unevenly, but it doesn't look as unbalanced as I feared.

 Had a sweet surprise in the mail yesterday from Pat (Amity Quilter blog). I had commented on a fabric she had used in a quilt and I was interested in it. She sent me some and I already know where it will go. See all of those HSTs a friend gifted me? This will be a perfect border fabric for a quilt from these pieces. I will throw in a little more darker blue with the triangles to tie it all together, but the orange-y coral and browns work great! Can't wait to get a chance to work on this. The quilt has been dancing in my brain for a while now.
Thanks, Pat!

Until next time, I am doing my best to stay away from SALs!! They really suck me in, as you can tell above.  : )
Janet O.

P.S. The Beast is in hibernation right now, but I really need to wake him up and finish him. It is so peaceful in the sewing room when he is asleep.

Saturday, March 5, 2016

What a hodge-podge!


What started out as a simple leader/ender project quickly became my main focus.
Wanted to get these little log cabin blocks made and sewn together. I've only ever made small log cabin blocks using foundation paper piecing, and that's not how I did these.
So I was a bit nervous when I began squaring up the blocks, afraid I would have very wonky ones that wouldn't look good once they were trimmed. I was pleasantly surprised. To the right is all that came off as I trimmed thirty  3 1/2" finished log cabin blocks. Just a fuzz pile! Whew! That means all of my piecing of minis has paid off in more accurate sewing.


I am certainly my own worst enemy when it comes to finishing up the pile of little flimsies. I keep adding to it! The leftover 1" log cabin strips were sliced into 1" squares and now these little blocks are taking shape.


I did complete the smallest two little quilts from my last basting binge. The one on the left was a block gifted to me by Vic. Quilting on it was pretty basic--SITD and a scallop in the border.
The batik quiltlet was one of my test pieces when I reviewed Lisa Bongean's Itty Bitty Eighth rulers. I used her Pinwheel Garden pattern.

I ditch-stitched this as well, and then added some swags in the white and the border.

All of the HSTs in this were from a swap I did quite a while back with Sandi. I have made a baby quilt, ornaments, a pincushion and now this little quilt, all from those HSTs. There are still a handful left. I think I definitely got the better end of the swap!


Have finally chosen a spot for my Lori Smith Fit to Frame piece, which is still nameless. It now radiates its charm in the dining room--at least for a while, until I change my mind and move it somewhere else.

And through it all, I continue to plod along on the mammoth T-shirt quilt, which has now spilled onto the floor. My design wall accommodates a queen size quilt, but this beast exceeds the limits.
All of the blocks have been bordered to bring them to a uniform size and the fussy-cutting of the plaid sashing has begun. The shirts are not in their final layout yet. My OCD-ness will not allow the colors to have such random placement. I've just been too lazy to bring in the step stool I need in order to reach the top blocks and rearrange everything.


It is this time of year again on the farm. Twins and triplets will soon be frisking about the pasture and I will have full view from my sewing room window. I can't wait!


Until next time,
Janet O.